Modern Electrolux dishwashers are equipped with perfect and reliable control and self-diagnostics systems. They check all the nuances of the device’s operation in real time. An error code appears on the dashboard display in an alphanumeric form. See the first two photos for an example.
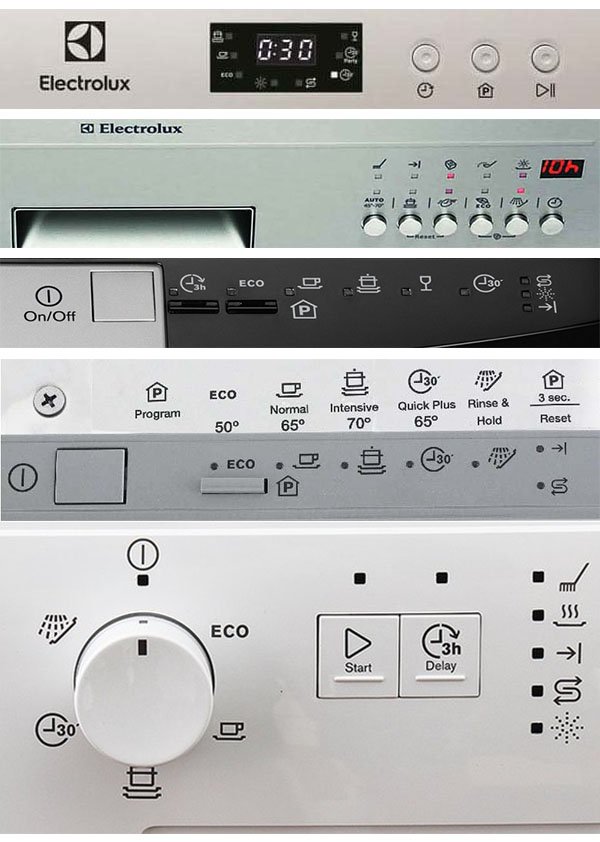
The early models of Electrolux dishwashers were not provided with any displays, so the error code was indicated by a flashing LED. An End ![]() indicator was a typical one for the most models. The error code is presented by the number of flashes at a rate of 2 Hz every 5 seconds. Flashing is complemented by the same number of sound signals. The three bottom photos show examples of a control panel the display with the End indicator. In the last photo, it is exactly in the middle in the far right row of indicators.
indicator was a typical one for the most models. The error code is presented by the number of flashes at a rate of 2 Hz every 5 seconds. Flashing is complemented by the same number of sound signals. The three bottom photos show examples of a control panel the display with the End indicator. In the last photo, it is exactly in the middle in the far right row of indicators.
Although more modern models display an error code, some models still report an error by flashing the End indicator. The first photo shows the control panel without this indicator, the second one – the panel with the indicator. Still, this rule is not universal. For example, an Electrolux ESL 66010 dishwasher detects a filling error in the operation mode. Then the i10 code is displayed along with the flashing Tap indicator. If there is a draining problem or a leak – the current program indicator flashes continuously (i20 and i30 codes respectively).
Note that you will not see all the errors of Electrolux dishwashers in the normal operation mode. The system will warn you only about the problems you are likely to solve (for example, an i10 error code means “No water supply”). All other codes, including their details, can be viewed only in a special test mode of the device. (Many codes have sub-codes that specify the nature and location of the fault.) In the table below, we will mention which codes are available to users on most models.
Water gaining, draining and heating up errors
The most widespread breakages and failures of a dishwasher of any brand are connected with water gaining and draining processes. In the majority of cases, it is caused by improper connection to water supply or sewerage and especially by the violation of the rules of operation.
Please note! Don’t muddle English letter I with figure 1 which lightens up on a dishwasher’s display
i10
The dishwasher is not filling: the required water level is not reached during the maximum time
Number of flashings: 1
Code availability, mode: Normal
i10 error code or single blink of an indicator with a five-second delay informs that water can’t enter a device. If in a minute storage tank is not filled with a certain amount of water, the problem appears. It can be caused by a closed water supply tap, a water supply hose bending or a clog in the filter that is located before the filling hose. Such reasons can be fixed independently and easily, without any difficulties.
Be sure to check:
- Litter in the nozzles, responsible for water supply.
- Filters clogging, if these elements are provided by the design of a particular model.
- Replacement of the device of the inlet is required.
The LED flashes once. The error signals about the problem when water doesn’t enter a device (in one minute, the predetermined level is not reached).
The drain pump turns on immediately, and the washing cycle is stopped.
- The water tap is closed, the water pressure is weak
- The filling hose is defective: it is clogged, pinched or damaged. An airlock may occur as well
- The drain hose is installed improperly, so the water is drained automatically. See the manual
- The inlet electrovalve is faulty, or its filter is clogged
- The water level sensor is broken. It requires replacement or cleaning of the water inlet path
i20
The system is failing to drain dirty water. After the maximum time, the water level switch hasn’t signaled the empty tub
Number of flashings: 2
Code availability, mode: Normal
i20 code or two blinks inform about no draining in a dishwasher (level relay for the time set by the program hasn’t triggered). If during the certain period of time a device can’t drain water causing the i20 error code, so most of all the cleaning filter is clogged, the drain pump is broken, the drain hose is bent or the water level sensor is out of order. As a rule, in order to get rid of the i20 problem, all you need is to clean the filters that are often clogged with food remnants, bones, and sometimes even with bits of broken dishes.
Please examine the next elements:
- The drain system is littered.
- The pump is out of order.
- The pump impeller pump is damaged.
- Malfunction of a device’s management module.
The washing cycle is stopped. The possible causes are the following ones:
- First you need to inspect the drain hose. It could be clogged, pinched or damaged
- Another obvious reason is the dirty drain filter. See the manual for the cleaning instructions
- The drain pump is malfunctioning. Call a handyman.
- The water level switch is faulty, or the control circuit of the sensor is open. If you have checked the circuit, and it is functioning, then you need to replace the sensor
i30
The float sensor of the “Aqua-Stop” system has sent a signal indicating a leak
Number of flashings: 3
Code availability, mode: Normal
i30 code or three blinks of an indicator mean that water leakage protection system has reacted. To be more precise, the water got into the drip tray, the float has triggered and a valve in the Aquastop system opened the water supply. To eliminate this error, it is necessary to drain the water from the tray and change the Aquasto phose (if it is mechanical). Also, you can just drain the water and bring the float out of the “water” position, tilting a dishwasher for it.
The washing cycle is stopped. The drain pump is activated. The possible causes are the following ones:
- If it is the drain pump that is leaking, it is likely to be beyond repair. You need to install a new pump
- Carefully examine all the places in the dishwasher the water can leak from: the inlet and outlet hoses, the door, the detergent drawer, the inner pipes, and the tub
- The float sensor is defective. It requires diagnosis and replacement
i60
The water is not heated or is heated very slowly or, conversely, overheated
Number of flashings: 6
Code availability, mode: Normal
i60 code or six blinks signal that a device doesn’t heat up water or conversely warms it above the set temperature level.
Therefore, temperature problems are right here. In this case, the error code can be caused by:
- A heating element has burnt;
- Electrical wiring is damaged;
- A temperature sensor is out of order;
- The small amount of collected water;
- Breakage of the circulation pump or control board.
It is worth checking:
- The heating element is out of order. It can be caused by a damage to the case, a breakthrough of the spark between the terminals, the resistance between them and some other moments.
- The temperature sensor is out of order and sends the wrong data to the module. Another option is that the information is not sent at all.
- The water level inside the circulation pump is below the permissible limit.
- The control board has a malfunction.
If you have even a small experience of working with technics, you’ll be able to change the heating element independently. Nevertheless, it’s much more complicated to diagnose a malfunction of wiring and control board. That’s why in most cases this responsible process is trusted to a specialist.
The washing cycle is still on at the temperature that was achieved. The possible causes are the following ones:
- The temperature sensor or water level sensor is defective. A broken sensor is usually replaced
- The control circuit of the electrical heating element is defective. Fix the wiring and secure the contacts
- The heater has burnt irreversibly. It is beyond repair
- The electronics is buggy. The controller board shall be replaced. Call the service shop
The Errors Related to Electrical Wiring and Sensors
This group of errors is considered to be more difficult in both diagnosis and elimination criteria. These error codes are related to Electrolux dishwashers:
i50
No information is received from the triac of the circulation pump motor, possibly due to a short circuit
Number of flashings: 5
Code availability, mode: Normal
I50 error code or five blinks of an indicator inform the user of the failure of the triac which is responsible for the operation of the circulation pump (a short circuit has occurred). In case of this malfunction, the pump runs for a while at full power, after which the washing program completely stops. You can eliminate the error only by replacing the triac on the control module.
When the motor does not receive commands from the controller, it will start working at maximum speed just in case. It is necessary to check and repair the circuit of the triac and replace it if faulty. All the elements of the triac are located on the electronic controller. So you’d better call an experienced technician for diagnostics.
i70
The resistance of the NTC sensor is out of range
Number of flashings: 7
Code availability, mode: Test
i70 error code or seven blinks of an indicator mean failure of the thermistor of the heating element, as a result of which the washing is carried out without water heating. In this case, stopping the washing process is not provided. The program will be executed to the very end, but the heating function is not activated. Replacing the NTC thermistor will solve this problem.
The washing cycle is still on without heating. The main possible cause is a short circuit, but the others are not excluded.
- The NTC sensor circuit is defective. Check and repair the wiring, tighten the contacts
- The actual sensor is faulty. it won’t hurt to check it, but a usual way out is to replace the malfunctioning sensor
- A control board element has burnt out
i80
Missing or unstable data exchange between the microprocessor and the EEPROM
Number of flashings: 8
Code availability, mode: Test
i80 error code or eight indicator blinks signal about the problem in EEPROM memory of the control module. Most likely, there was a flashing of the firmware or a breakdown of the control module.
You need to check the circuit containing the processor and the memory and make sure the board power supply is OK. Given that we are talking about the main motherboard, we do not recommend doing anything about it yourself. Call the service shop
i90
The hash total of the dishwasher configuration is wrong
Number of flashings: 9
Code availability, mode: Test
I90 error code of nine indicator blinks inform about the malfunction of the MCF or CCF control board. In this case, a user can’t pick any washing mode and only on/off button is lighten up. The problem is solved by module replacement.
Nine blinks of a LED mean a receiving an incorrect checksum during the program process. The most likely option is the problem with the firmware. Sometimes, the ON/OFF LED lights up, and END does not blink.
The error appears when the dishwasher is turned on. As a result, the choice of the washing program is not available.
- Enter the correct configuration code
- Update the firmware of the control board. It shall be done by a certified specialist only
- The main control board is faulty. Contact the service shop
iA0
An arm cannot rotate properly
Number of flashings: 10
Code availability, mode: Test
iA0 error code or ten indicator blinks signal that the sprinkler inside the machine does not rotate. This can be caused by jamming as a result of the voltage jump. Most often, the reason is much simpler – the dishes are settled in a wrong way. However, the fault is also caused by program failures, and not by a technical malfunction.
The electronics controls the rotation of the arm at each stage of the washing cycle.
- The dishes arrangement is wrong in the basin
- The circuit of the sensor controlling the speed of rotation is open
- The sensor is faulty
- The controller is defective
iB0
The turbidity sensor is faulty (if available in this model)
Number of flashings: 11
Code availability, mode: Test
iB0 error code or eleven indicator blinks signal that the sensor that determines the transparency of water is out of order. The breakage occurs if there is no data on the turbidity of water for 15-20 seconds. The most likely option is the need to replace the transparency sensor. The dishwasher stops all processes and waits for the moment when the connection is restored. The cause of the malfunction may be a malfunction of the module. The board must be diagnosed and replaced if needed.
The washing cycle is not off, but the electronics assumes significant contamination just in case
- Clean the dishwasher basin
- The circuit containing the sensor is open. Check and fix the wiring, connect the contacts securely and tighten them
- The turbidity sensor is defective. You need to replace it.
- The controller is malfunctioning. Call a specialist
iD0, iAd0
No signal is received from the tachogenerator of the circulation motor
Number of flashings: 13
Code availability, mode: Test
iD0 error code or thirteen indicator blinks inform about the breakage of the tachogenerator of the circulation pump in case of absence of a signal for 20 seconds. The water does not heat up.
Possible malfunctions:
- Tachogenerator sensor is out of order.
- A tear occurred in the tachogenerator circuit.
- The problem is in the control module.
The circulation motor is powered, but the tachogenerator won’t provide a confirmation message. When the data on the speed of the motor is unavailable, it is forced to run at too high speeds
- The circuit containing the sensor is open, or the contacts are disconnected
- The tachogenerator is defective. You need to replace it
- The motor capacitor has burnt out. You need to replace it as well
- A motor element is defective. It requires some complex diagnostics, repair or replacement if necessary
iF0
iF0 error code or fourteen blinks of an indicator means exceeding the time limit in the process of filling a device with water. The problem appears due to the too long period of the bay. Unlike the i20 error code, the failure is more often caused by software factors.
iC0
An error has been detected in communication between the user interface (display) board and the control module
Number of flashings: 12
Code availability, mode: Test
If there is no data from the information display, the washing cycle is stopped temporarily for the connection to be restored
- The circuit containing the boards is open, or the contacts are disconnected
- A display board element has burnt out. It needs some diagnosis, repair or replacement
- The same is true for the motherboard. If that’s the case, do not hesitate to contact the service shop
Other error codes for the Electrolux Dishwasher
Code table 1
Alternative error codes for Electrolux dishwashers
| Error codes | Fault Condition | Parts Required | Repair or Check |
| 01 | Water Leak Is Detected (Sensor under the dishwasher detected a leak) |
| Remove power to the dishwasher. Check hoses, pumps, and tub to find the leak. Replace any parts leaking |
| 02 | Thermistor Sensor Fail | Thermistor Sensor | Remove power power to the dishwasher and check the thermistor sensor circuit wiring. If the wiring checks out then replace the thermistor sensor. |
| 03 | Wash Motor Fail | Wash Motor | Remove power to the dishwasher. Inspect the wiring for the wash motor. If the wiring checks out then check for an blockage in the pump. Replace the wash motor if the pump is not blocked and the wiring checks out. |
| 04 | Upper Fan Fail | Upper Fan | Remove power to the dishwasher and check the wiring for the upper fan. If the wiring checks out then replace the upper fan. |
| 05 | Upper Fan or Vent Fail | Upper Fan or Vent | Remove power to the dishwasher and check the wiring for the upper fan vent. If the wiring checks out then replace the upper fan vent |
| 06 | Lower Fan Fail | Lower Fan | Remove power to the dishwasher and check the wiring for the lower fan. If the wiring checks out then replace the lower fan |
| 07 | Drain Valve Fail | Drain Valve | Remove power to the dishwasher and check the wiring for the drain valve. If the wiring checks out then replace the drain valve. |
| 08 | User Interface Control Fail | User Interface Control | A switch on the user interface is possibly defective. Replace the complete user interface. |
| 09 | Communication Fail From User Interface Control TO Electronic Control Board | User Interface Control – Electronic Control Board | Remove power to the dishwasher and check for any loose wiring connections between the user interface control and the electronic control board. If the wires and connections check out then replace the user interface control. If the problem persists then replace the electronic control board. |
| 10 | Electronic Control Board (Relay) Fail | Electronic Control Board | A relay on the electronic control board possibly failed. Replace the complete electronic control board. |
| 11 | Drain Valve Fail | Drain Valve | Remove power to the dishwasher and check the wiring for the drain valve. If the wiring checks out then replace the drain valve. |
| 12 | Drain Valve Position (Drain valve has activated when it should be turned off) | Electronic Control Board – Dr ain Valve | Remove power to the dishwasher. Check the drain valve wiring for an issue. If the wiring checks out then replace the electronic control board. (This is because the drain valve relay on the control board is stuck) If the problem persists then replace the drain va lve. |
| 13 | Electronic Control Board Fail | Electronic Control Board | The control board has a component failure. Replace the complete electronic control board. |
Code table 2
Electrolux WTCS90ERB dishwashers error codes
| Error codes | Cause | Repair or Check |
| A1 | No water |
|
| B1 | Insufficient drainage |
|
| B2 | Tank water level too high |
|
| C1…C8 | Call the authorized service center | |
| E1…E8 | Call the authorized service center | The appliance continues to operate, but appropriate checks by an authorized technician are recommended. |
Code table 3
Electrolux Wt830m/pw1m dishwashers error codes
| Code | Description | Possible cause |
| 11 | The Air Gap was not completely filled within the max. filling time. |
|
| 12 | The pressure sensor on the air gap does not work correctly. |
|
| 13 | The Duo-Rinse tank was not completely filled within the max. filling time. |
|
| 14 | The pressure sensor on the Duo- Rinse tank does not work correctly. |
|
| 15* | The required temperature was not reached in the boiler within the max. heating time. |
|
| 16 | The water temperature in the boiler is too high. |
|
| 17 | The boiler temperature sensor is short-circuited. | The boiler temperature sensor is short circuited. |
| 18 | The boiler temperature sensor is open. |
|
| 19** | The required temperature was not reached in the Duo-Rinse tank within the max. heating time. |
|
| 20 | The water temperature in the Duo- Rinse tank is too high. |
|
| 21 | The Duo-Rinse tank temperature sensor is short-circuited. | The Duo rinse temperature sensor is short circuited. |
| 22 ** | The Duo-Rinse tank temperature sensor is open. |
|
| 23 | SHORT compact and modular: The rinse pump thermal protector has tripped. |
|
| 24 ** | The Duo-Rinse pump thermal protector has tripped. |
|
| 25 ** | The Duo-Rinse tank was not completely emptied within the max. emptying time. |
|
| 30** | The Air gap was not completely emptied within the max. emptying time. |
|
| 31 | The wash tank was not completely filled within the max. filling time. |
|
| 32 | The pressure sensor on the wash tank does not work correctly. |
|
| 33** | The required temperature in the wash tank was not reached within the max. heating time. |
|
| 34 | The water temperature in the wash tank is too high. |
|
| 35 | The wash tank temperature sensor is short-circuited. | The wash tank temperature sensor is short circuited. |
| 36 ** | The wash tank temperature sensor is open. |
|
| 37*** | The upper wash pump thermal protector has tripped (SHORT compact and modular machines only). |
|
| 38** | The lower wash pump thermal protector has tripped. ( modular machines only ) |
|
| 39** | The CU (Condensing unit) fan thermal protector has tripped. (SHORT compact and modular machines only). |
|
| 40** | The wash tank was not completely emptied within the max. emptying time. |
|
| 51 | The prewash tank was not completely filled within the max. filling time. |
|
| 52 | The pressure sensor on the prewash tank does not work correctly. |
|
| 53 ** | The required temperature in the prewash tank was not reached within the max. heating time. |
|
| 54 | The water temperature in the prewash tank is too high. |
|
| 55 | The prewash tank temperature sensor is short-circuited. |
|
| 56 ** | The prewash tank temperature sensor is open. |
|
| 57 ** | The prewash pump thermal protector has tripped. |
|
| 58 ** | The prewash tank was not completely emptied within the max. emptying time. |
|
| 60 | The CU temperature sensor is short- circuited (machines with heat pump only). | The CU temperature sensor or the connection wires are short circuited. |
| 61 | The CU temperature sensor is open (machines with heat pump only). |
|
| 62 | The heat pump has generated an error (machines with heat pump only). | Check the heat pump. |
| 71 ** | The required temperature in the drying tunnel was not reached within the max. heating time. |
|
| 72 | The drying tunnel temperature is too high. |
|
| 73 | The drying tunnel temperature sensor is short-circuited. | The DT temperature sensor is short-circuited. |
| 74**** | The drying tunnel temperature sensor is open. |
|
| 75 ** | The drying tunnel fan thermal protector has tripped. |
|
| 76 | The gear motor supplied current is higher than the maximum value allowed for the “Max motor curr”. |
|
| 77 | The gear motor supplied current is lower than the minimum value allowed for the gear motor current. |
|
| 82** | The required temperature was not reached in the first boiler within the max. heating time. |
|
| 83 | The water temperature in the first boiler is too high. |
|
| 84 | The first boiler temperature sensor is short-circuited. | The first boiler temperature sensor is short circuited. |
| 85 | The first boiler temperature sensor is open. |
|
| 89 | The temperature on the user interface is too high. |
|
| 90 (modular machines) | Communication problems between machine electronic boards. |
|
| 27 | The gear motor Inverter has generated an alarm (compact machines only). | The Inverter or the gear motor doesn’t work properly. Possible machine alarms documented on | Possible cause | Remedy |
| 1) OCF over current |
| check the state of the mechanism. | ||
| 2) SCF motor short circuit | insulation fault or shortcircuit at the drive output | check the cables connecting the drive to the motor, and the motor insulation. | ||
| 3) InF internal fault | internal fault |
| ||
| 4) CFF configuration fault |
| return to factory settings. | ||
| 5) SOF over speed |
| return to factory settings. | ||
| 6) CrF internal fault | load relay control fault or damaged load resistor | replace the drive. | ||
| 7) OHF drive overload | drive temperature too high | check the motor load and the environment. Wait for the drive to cool down before restarting. | ||
| 8) OLF motor overload | triggered by motor current too high | check the motor load. Wait for the drive to cool down before restarting. | ||
| 9) OSF overvoltage |
| check the line voltage. The overvoltage threshold is 415 V on the DC bus. | ||
| 10) ObF overvoltage during deceleration | braking too sudden or driving load. | increase the deceleration time. | ||
| 11) PHF line phase failure |
|
| ||
| 12) USF undervoltage |
| check the voltage and the voltage parameter. The under voltage threshold is 230 V on the DC bus. replace the drive. |
Code table 4
Electrolux ESL 65070R dishwashers error codes
| Alarm code | Problem |
| The appliance does not fill with water. |
| The appliance does not drain the water. |
| The anti-flood device is on. |
Code table 5
Electrolux ESL 6115 dishwashers error codes
| Fault code / malfunction | Possible cause | Solutions |
| The water tap is blocked or furred with limescale. | Clean the water tap. |
| The water tap is turned off. | Turn the water tap on. | |
| The filter (where present) in the threaded hose fitting at the water inlet valve is blocked. | Clean the filter in the threaded hose fitting. | |
| The water inlet hose has not been correctly laid or it is bent or squashed. | Check the water inlet hose connection. | |
| The sink spigot is blocked. | Clean out the sink spigot. |
| The water drain hose has not been correctly laid or it is bent or squashed. | Check the water drain hose connection. |